 Tweet
Tweet
As discussed elsewhere on PradoPoint, I've decided to fit Polyair airbags to my 120. This is as a result of the sag noticed in the rear end while towing my camper trailer when fully loaded after having a 50mm suspension lift fitted. The sag wasn't too much, but it was enough to cause my headlamp aim to be incorrect and you could feel that the vehicle was sitting on it's arse.
I shopped around, remembering that I was quoted a special price at the Caravan and Camping Show at Rosehill last year. I phoned Polyair as I couldn't make it to the show this year as we were interstate. The bloke on the phone said, "Sorry mate, stiff crap if you didn't get to the show - no special prices." Smart Arse. One thing he did say was to give Repco a try. Good ole Repco. Polyair quoted me $299 plus $15 postage. I ended up getting the kit from Repco for $250! :-) My local ARB dealer quoted my $550 including fitting - so there's a range of prices out there.

The appropriate kit for a lifted 120 has part number 12995, and are the same price as the standard kit, part number 12895.
Fitting was fairly straight forward, glad I have the Factory Service Manual though. The last suspension I worked on was my 1958 Morris Minor. Things were a bit different under the Morrie! :-)
First thing that needed to be done was to put the vehicle up on stands (under the chassis, not the axle) and remove the wheels.

Then the diff needed supporting with the trolley jack while it was disconnected. The bottom shock mounts need to be disconnected to get the springs out.
The stone guard fitted to the Bilstein shock needed to be bent up to get a socket on the nut. These are torqued up very tight so they needed a big driver handle.
Once the lower shock mounts were undone the springs could come out. They were a squeeze and a bit hard to remove, obviously due to the fact they I have the bigger springs installed. I didn't thing they'd go back in the same way without lowering the diff more.

The airbags fit inside the spring as per the instructions, but the instructions didn't make mention of what to do with the black plastic rings, I figured they'd go on the top of the airbag where the air hose emerges. I reinforced the air hose connection with self amalgamating tape. I cut the hose in half, one for each side, after making sure they were long enough to reach the valve installation point.
The bump stop that resides inside the spring needs to be cut down as per the instructions to accommodate the airbag being inside the spring. This caused a lot of head scratching, because I'd read here that due to the suspension being lifted the bump stop had to be cut at the second lug down. But why didn't the instructions say this? Were they dogey instructions? So I did a bunch of measuring and decided to trust the instructions - which turned out to be the right decision.

The above shot shows the chopped down bump stop.
The instructions also call for the hole in the top spring locator (mounted on the chassis) to be drilled out. This hole was already plenty big enough on my vehicle so I decided leave it as is.
Now it came time to squeeze the spring back in. There was no way it was going in by hand. What was needed? I disconnected the panhard rod and the brake lines mount and that allowed the diff to drop a little lower, but still not far enough. I considered buying some spring compressors, but the needless expenditure and the 80km return trip to the auto parts store sent me looking for other alternatives.
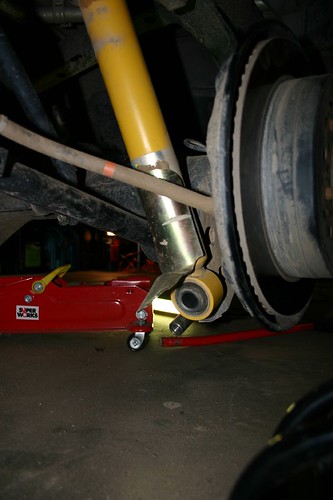
There was still a bit of give in the diff as it was now suspended by the sway bar, I just couldn't push it down and re-fit the spring by myself. Then I came up with this idea:

The Toyota jack was perfect for this and it allowed me to hand wind down enough space to easily fit the spring by myself. Doing one side at a time allows the diff to articulate somewhat also. The above image shows the driver's side as I forgot to show a shot of the jack doing it's job on the passenger side. You can also see the disconnected panhard rod.

So the springs were back under the truck with the airbags fitted, time to tighten everything back up and see how it all sits. I made sure all bolts were re-fastened to factory torque specifications.
Went through the suspension settling procedure described in the factory manual and gave everything a tighten to final torque. The instructions were right, the bags were contacting both mounts properly with weight on wheels.
The air hoses were routed along the top of the chassis rails to the rear of the vehicle. I installed split tubing conduit to protect the lines from rocks and sticks.


I installed the inflation valves in the small hatch used for the spare winder (not used in Australian 120s) located in the rear door jamb.


The last shot above shows the airbag inflated to full operating pressure, 30psi.
So how do they perform?
At minimum pressure (5psi) the rear suspension feels stiffer than before the Polyairs were fitted. I was surprised by this.
I loaded my full recovery kit, snow chains, and four 35kg batteries into the back of the 120 and then hitched up our camper trailer with 25 litres of water on the drawbar, and it sat level. :-)
I'm looking forward to giving it a proper test run on the road, but haven't had time to take it all camping just yet.
It was a managable job, taking about 6 hours with a bit of head scratching thrown in. I'm glad I did it myself, saving a fair bit of money. Having the Factory Service Manual for the 120 makes things a lot easier. Because I don't work in the automotive industry, but I have fairly good hand skills from my work, having the manual provides that extra bit of know-how. Not to mention it having all the important torque figures.
If you are considering doing this yourself, be mindful of the fact that you are working on the suspension and rear diff. There is no room for stuff ups, the vehicle's safety (and your passenger's) is at stake, so give it some thought.
I hope this article was useful, feel free to fire away with any questions.
Cheers,
Drew.
This article is general in nature and should not be used in place of personal professional advice. Readers are reminded of their responsibility to make their own informed decisions and to not rely solely on the content of this article. :-)
I shopped around, remembering that I was quoted a special price at the Caravan and Camping Show at Rosehill last year. I phoned Polyair as I couldn't make it to the show this year as we were interstate. The bloke on the phone said, "Sorry mate, stiff crap if you didn't get to the show - no special prices." Smart Arse. One thing he did say was to give Repco a try. Good ole Repco. Polyair quoted me $299 plus $15 postage. I ended up getting the kit from Repco for $250! :-) My local ARB dealer quoted my $550 including fitting - so there's a range of prices out there.
The appropriate kit for a lifted 120 has part number 12995, and are the same price as the standard kit, part number 12895.
Fitting was fairly straight forward, glad I have the Factory Service Manual though. The last suspension I worked on was my 1958 Morris Minor. Things were a bit different under the Morrie! :-)
First thing that needed to be done was to put the vehicle up on stands (under the chassis, not the axle) and remove the wheels.
Then the diff needed supporting with the trolley jack while it was disconnected. The bottom shock mounts need to be disconnected to get the springs out.
The stone guard fitted to the Bilstein shock needed to be bent up to get a socket on the nut. These are torqued up very tight so they needed a big driver handle.
Once the lower shock mounts were undone the springs could come out. They were a squeeze and a bit hard to remove, obviously due to the fact they I have the bigger springs installed. I didn't thing they'd go back in the same way without lowering the diff more.
The airbags fit inside the spring as per the instructions, but the instructions didn't make mention of what to do with the black plastic rings, I figured they'd go on the top of the airbag where the air hose emerges. I reinforced the air hose connection with self amalgamating tape. I cut the hose in half, one for each side, after making sure they were long enough to reach the valve installation point.
The bump stop that resides inside the spring needs to be cut down as per the instructions to accommodate the airbag being inside the spring. This caused a lot of head scratching, because I'd read here that due to the suspension being lifted the bump stop had to be cut at the second lug down. But why didn't the instructions say this? Were they dogey instructions? So I did a bunch of measuring and decided to trust the instructions - which turned out to be the right decision.
The above shot shows the chopped down bump stop.
The instructions also call for the hole in the top spring locator (mounted on the chassis) to be drilled out. This hole was already plenty big enough on my vehicle so I decided leave it as is.
Now it came time to squeeze the spring back in. There was no way it was going in by hand. What was needed? I disconnected the panhard rod and the brake lines mount and that allowed the diff to drop a little lower, but still not far enough. I considered buying some spring compressors, but the needless expenditure and the 80km return trip to the auto parts store sent me looking for other alternatives.
There was still a bit of give in the diff as it was now suspended by the sway bar, I just couldn't push it down and re-fit the spring by myself. Then I came up with this idea:
The Toyota jack was perfect for this and it allowed me to hand wind down enough space to easily fit the spring by myself. Doing one side at a time allows the diff to articulate somewhat also. The above image shows the driver's side as I forgot to show a shot of the jack doing it's job on the passenger side. You can also see the disconnected panhard rod.
So the springs were back under the truck with the airbags fitted, time to tighten everything back up and see how it all sits. I made sure all bolts were re-fastened to factory torque specifications.
Went through the suspension settling procedure described in the factory manual and gave everything a tighten to final torque. The instructions were right, the bags were contacting both mounts properly with weight on wheels.
The air hoses were routed along the top of the chassis rails to the rear of the vehicle. I installed split tubing conduit to protect the lines from rocks and sticks.
I installed the inflation valves in the small hatch used for the spare winder (not used in Australian 120s) located in the rear door jamb.
The last shot above shows the airbag inflated to full operating pressure, 30psi.
So how do they perform?
At minimum pressure (5psi) the rear suspension feels stiffer than before the Polyairs were fitted. I was surprised by this.
I loaded my full recovery kit, snow chains, and four 35kg batteries into the back of the 120 and then hitched up our camper trailer with 25 litres of water on the drawbar, and it sat level. :-)
I'm looking forward to giving it a proper test run on the road, but haven't had time to take it all camping just yet.
It was a managable job, taking about 6 hours with a bit of head scratching thrown in. I'm glad I did it myself, saving a fair bit of money. Having the Factory Service Manual for the 120 makes things a lot easier. Because I don't work in the automotive industry, but I have fairly good hand skills from my work, having the manual provides that extra bit of know-how. Not to mention it having all the important torque figures.
If you are considering doing this yourself, be mindful of the fact that you are working on the suspension and rear diff. There is no room for stuff ups, the vehicle's safety (and your passenger's) is at stake, so give it some thought.
I hope this article was useful, feel free to fire away with any questions.
Cheers,
Drew.
This article is general in nature and should not be used in place of personal professional advice. Readers are reminded of their responsibility to make their own informed decisions and to not rely solely on the content of this article. :-)


Comment