 Tweet
Tweet
good point -scratch that idea
-
December 2007 Prado GXL diesel, Option Pack with traction control, rear airconditioning and curtain airbags. Lovells Springs and Bilstiens shocks, snorkel, front recovery points,
ARB Bar with fog lights, ARB second battery system, sandgrabber mats, Pirelli ATR Tyres, -
Here is a thread on the diff breather mod on fjcruiserforums.com.
When pics get removed follow this link....
http://www.fjcruiserforums.com/forum...ather-mod.html
From Shadow Warrior in fjcruiserforums.com
Toyota has moved the Front Differential and Front Actuator breathers up high in the engine bay already for you, but neglected to move the Rear Differential breather, E-Locker breather, Transsmission & Transfer Case Breathers. Those with the MT will only have one breather in the engine bay area, you don't have the front actuator like the AT's do. I decided to relocate the breathers up high too, I would normally run all breathers inside the vehicle, but since the front is already in the engine bay. I decided to run the rear differential & Locker there too. I want to say this has been a collective effort by many on doing this Breather MOD.
****UPDATE****
Check out this video on Diff Breathers
Diff Breathers for 4x4
"IF YOU DON'T TRAVEL IN HIGH WATER, YOU DO NOT HAVE TO DO THIS MOD"
I will start off with my own way of accomplishing this first. I have added Blackcherry's & Dukeofjuke�s MOD location at the end of this post. This is mainly do to mine being a little more complete and clear as far as following along with directions, pictures and tools needed to do this MOD.
To do my way of the Filter location in the engine bay you will need the following items:
Need to Purchase
1. 15� of �� Fuel line. (Shop around, I paid .85 cents a foot, I have seen it for 1.85 a foot)
2. You will need to order a Toyota Camry Fuel Line Union Part # 90404-51026 ($3.50)
3. You will need to buy (3) small � inch Hose clamps
4. You will need some plastic Zip Tie�s for securing the hose from the rear to the engine bay.
5. You will need a small piece of 16ga steel (This can be purchased from Lowe�s or Home Depot)
6. Rustolem Flat Black paint (If you don�t have any, Check with Dragon I�m sure he has plenty lying around. He's the undisputed �Rattle Can King�. J/K
7. You will need to buy a small 1/4" x 1/4" x 1/8" �T� for tying in the E-Locker hose to the Rear Differential Hose. This can be purchased at any Automotive store for under a dollar.
Tools Needed
1. You will need a standard screw driver (for Hose clamps)
2. You will need a Dremel Tool with Cut-off wheels or a Hand held Grinder with cut-off wheel.
3. Knife to cut the fuel hose to length
4. Your going to need some sand paper and metal file to smooth out the edges of the bracket.
The Following are some pictures of the items as listed above.
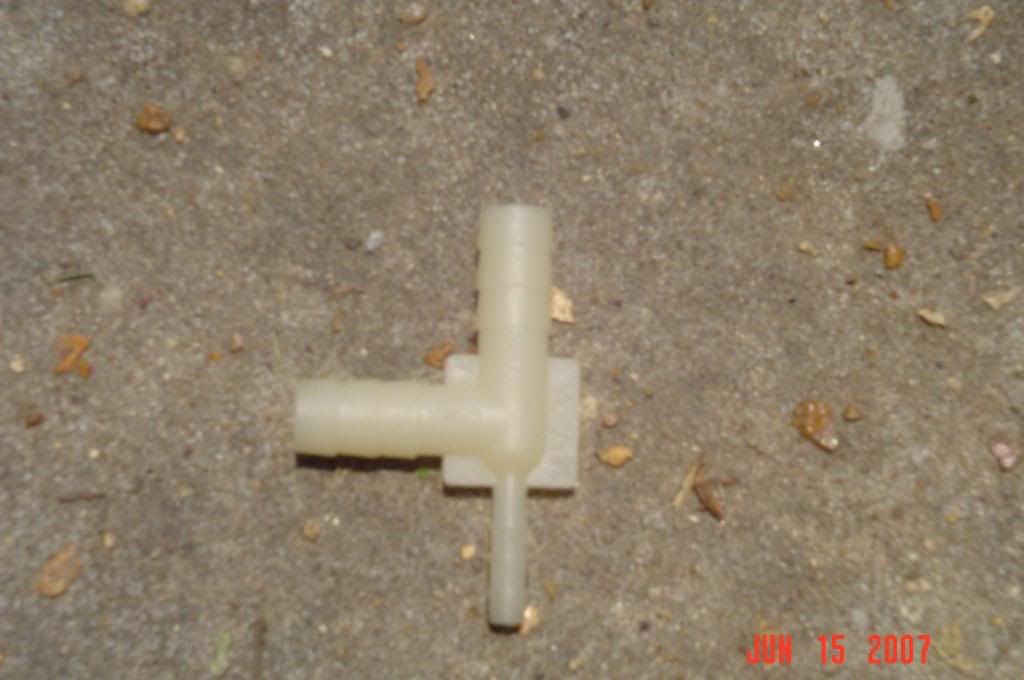
This is a 1/4" x 1/4" x 1/8� �T� You can pick these up at any Automotive store for under $1.00

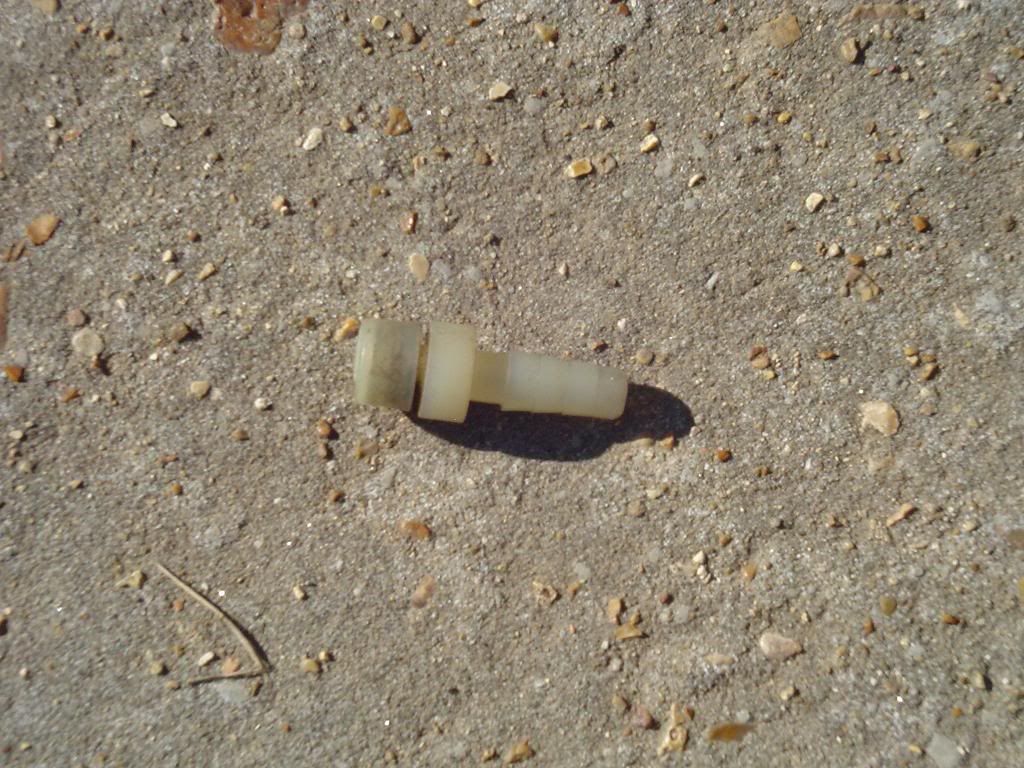
Here is a picture of the Toyota Camry �Union� part number # 90404-51026
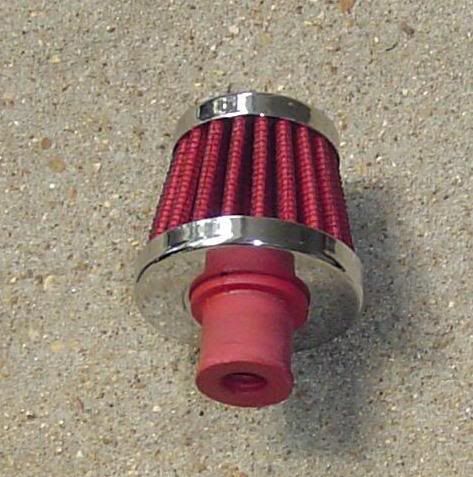
I found a nice small air breather from AutoZone, $9.95 It�s made by �Spectre� Part number 3992, they come in different colors, Silver, Blue, Red, Yellow,etc. The following are pictures of the small colored Filters, they are very similar to a K&N filter. I used a little oil on mine to keep it water proof too.
I went ahead and did the leg work for everyone for the small colored breathers.
Here is the following part numbers for the colored filters
Specter Part number # 3992 Red Breather
Specter Part number # 3994 Yellow Breather
Specter Part number # 3995 Silver Breather
Specter Part number # 3996 Blue Breather
Specter Part number # 3998 White Breather
Here is the web site : Spectre Performance - Official Site
You can also find them in your local automotive store too.
I decided to stay with the TRD theme, (Red). I also purchased 20 feet of � fuel line for running the hose to the engine bay. I shopped around a bit for it, Pep Boys wanted $1.85 a foot, I found it at O�Reillys for .85 cents a foot.
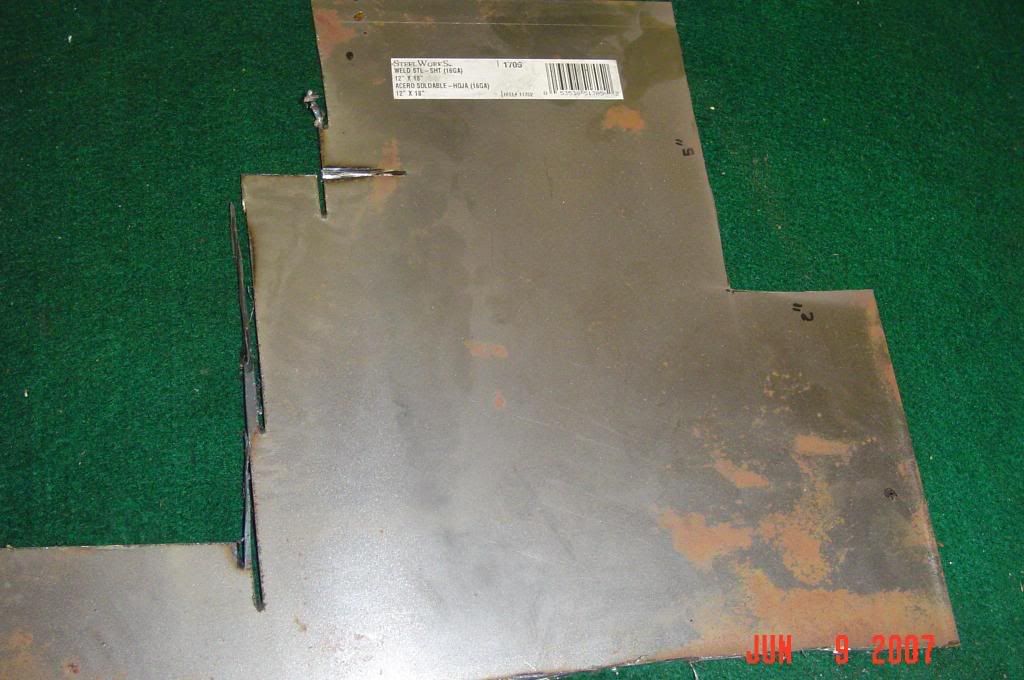
I had some 16ga steel left some from my CB mount MOD and Fuse box MOD, so I used this material for making my breather bracket. You can purchase this at Lowe�s or Home Depot for under $10.00 I decided along the drivers side close to the firewall for the breather location.
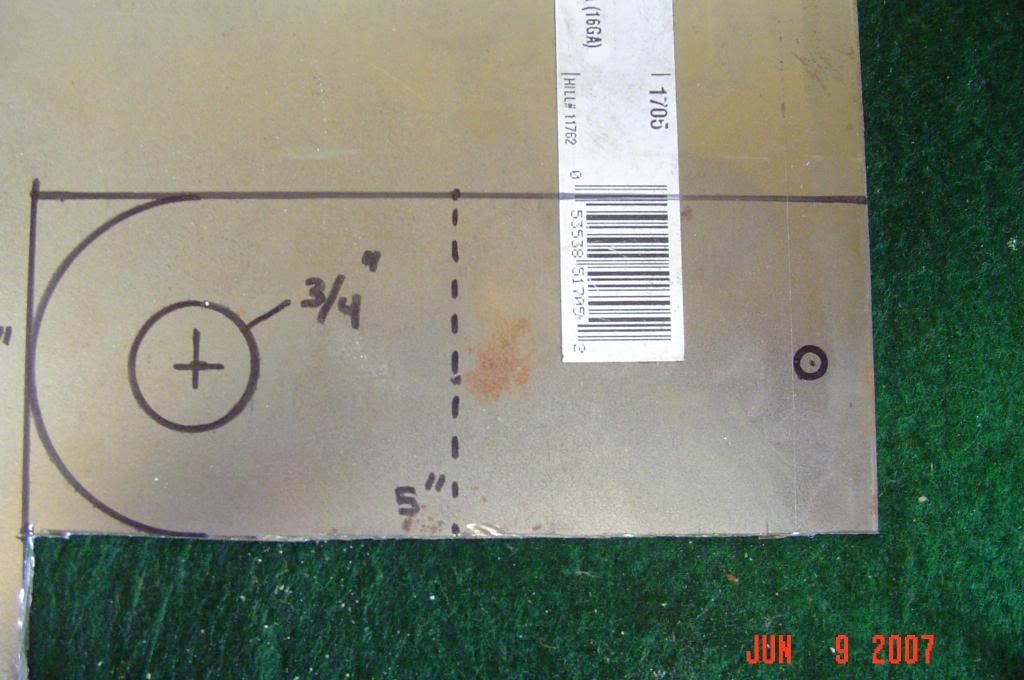
I measured a 2� wide, 5� long would be just right for the bracket. I also decided to make one end round. I used my dremmel tool with cut-off wheel to cut the shape out; you can use a handheld grinder, etc. I then drilled out a � inch hole for the filter. I then bent the bracket 2.5 inches back from the top of the bracket. My wife had the camera so, I couldn�t take any pics of the bracket at this stage.
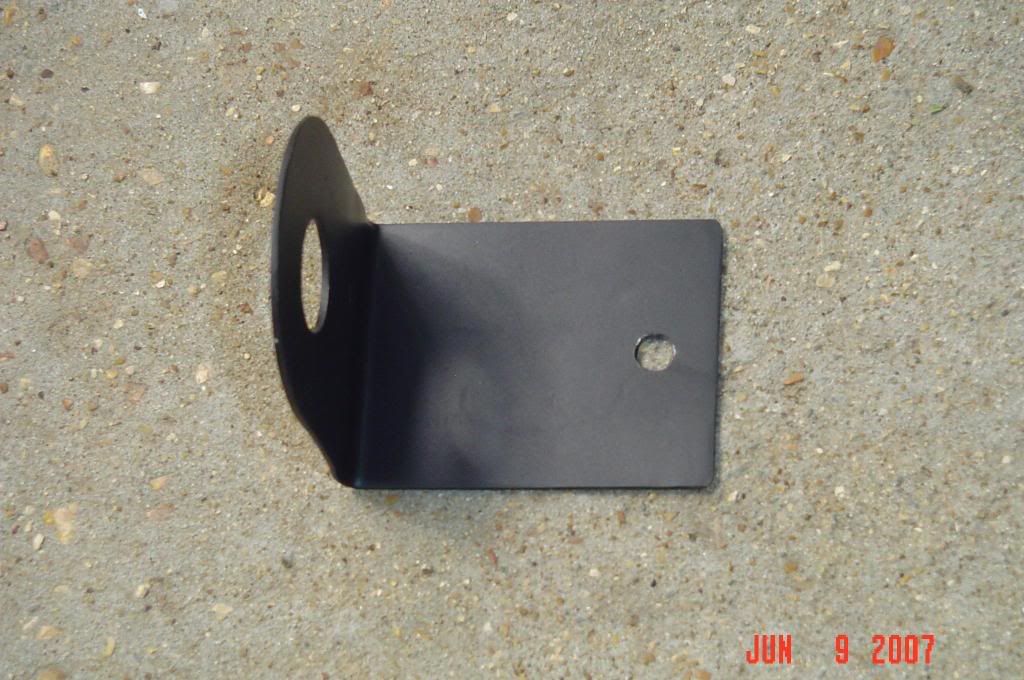
I then sprayed the bracket with gray primer, then a coat of flat black.
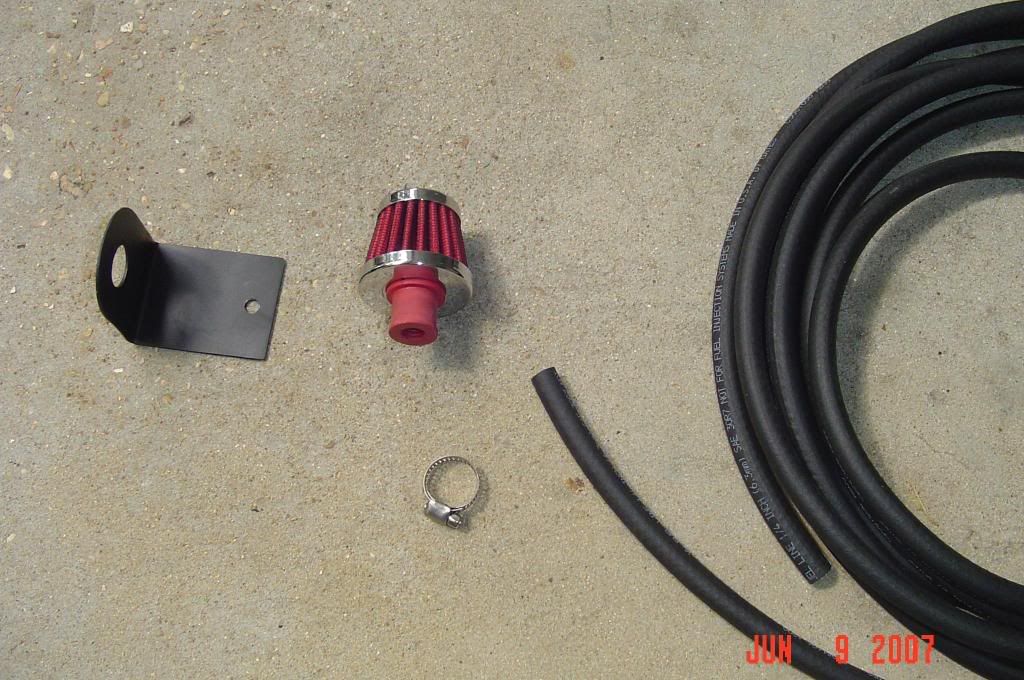
I bought a self tapping metal screw with lock washer for attachment to the firewall.

I attached the breather to the bracket, then the hose to the breather, then ran the hose along the bottom under the vehicle.
I attached the hose with tie wraps along the frame.
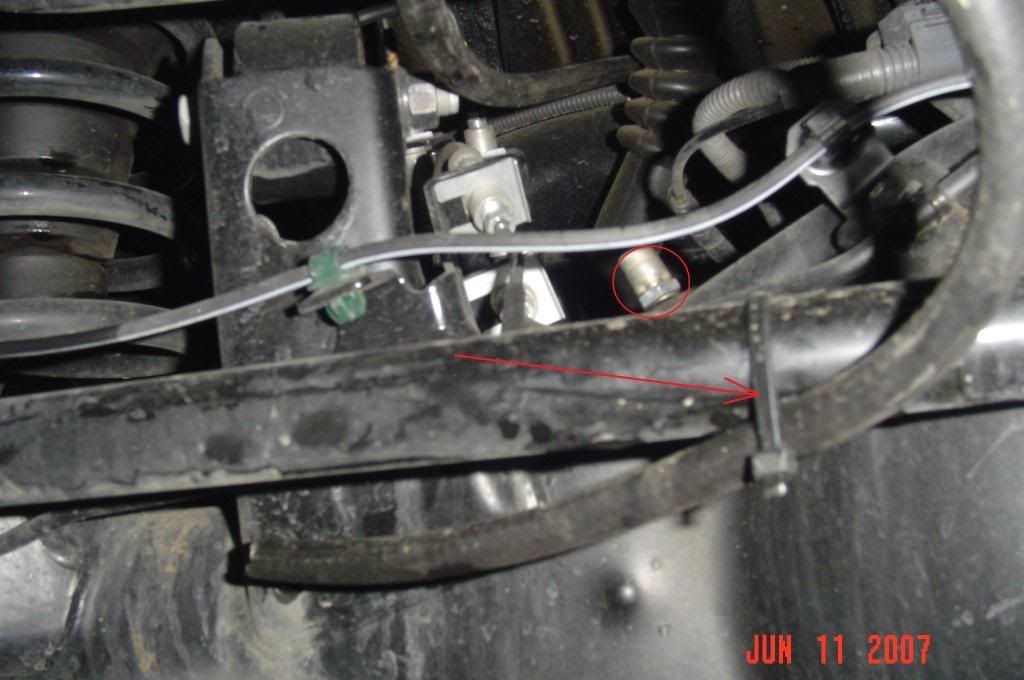
In this pic you can see I left a good portion of the hose and then cut it off, tie wrapping it to the cross bar. Please don not cut the hose off to short, you want to leave enough room for your rear axel to be able to articulate without pulling out the hose from the Union.

The new Union installed.
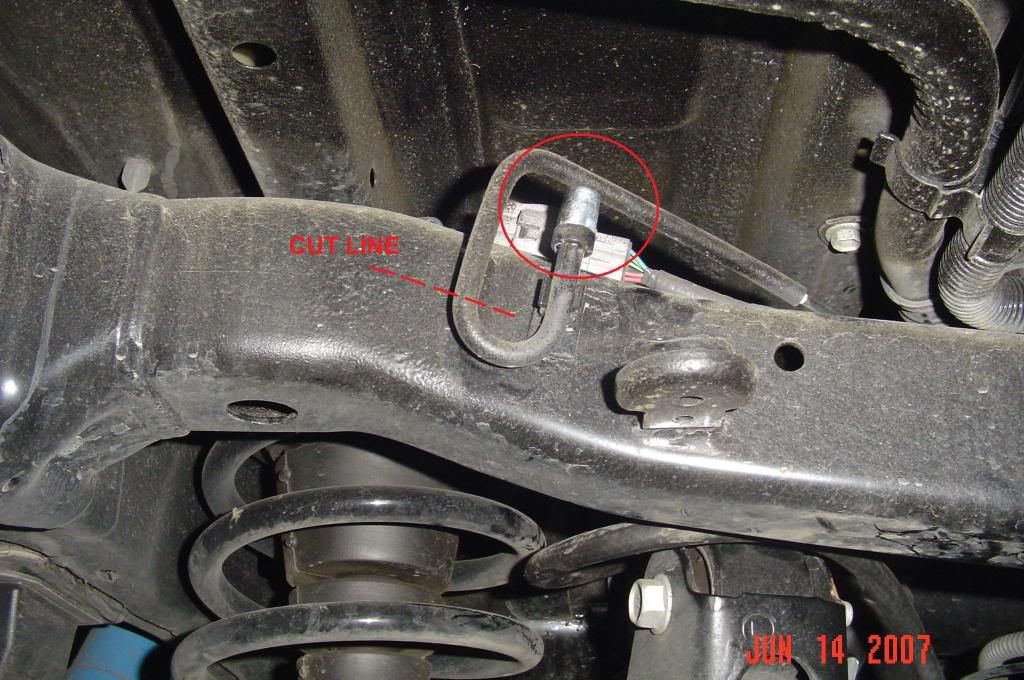
This is a pic of the existing E-Locker location, This is what we are going to remove and install the �T� to. You need to cut about 3-4 inches from the locker hose breather end off. See the "CUT Line in the above pic. Then push the "T" into the small locker hose. I then used (2) small ties wraps for securing it, hose clamps are to small.
The newly installed "T" run from the Rear Differential Hose & E-Locker then into the Main hose which runs all the way to the engine bay.
Finished Rear Differential & E-Locker Breather location in the engine bay.
Auto Transmission & Transfer case breather location & information for relocation of breathers.
A new member Jim (007FJ) took the time to wade through hundreds of pages of the Repair manual to find the Transmission Breather and Transfer case breather locations. I new they were there, but never took the time to go find them since they were located higher up inside under the vehicle. With that being said, I too will be relocating these too just like the rear differential and E-Locker breathers. If your running in deep water it pays to take the time and relocate all your breathers up high to prevent damage to the drive train. Thanks again Jim and to the others that have helped to make us all water tight out the on the trails.
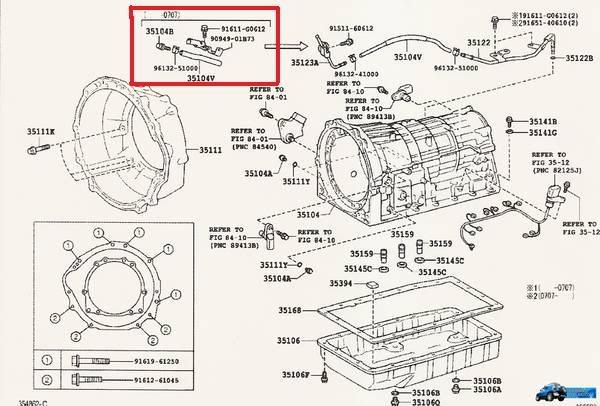
Here are the following Schematics of the locations of the AT Transmission & Transfer Case breathers.
Auto Transmission Breather Location (MT doesn't have this Breather)
Here is the MT (Manual Transmission Breather Location)
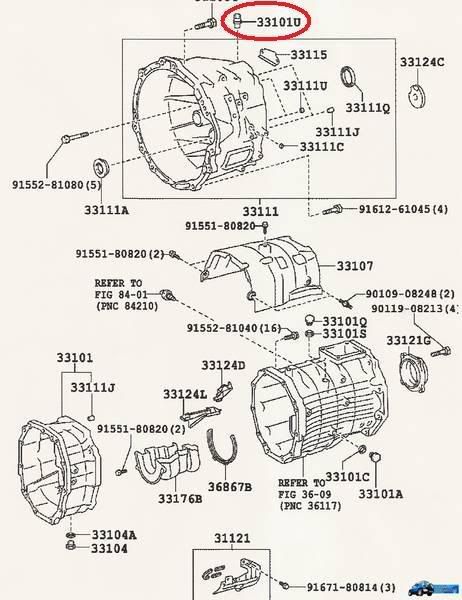
Transfer Case Breather Location
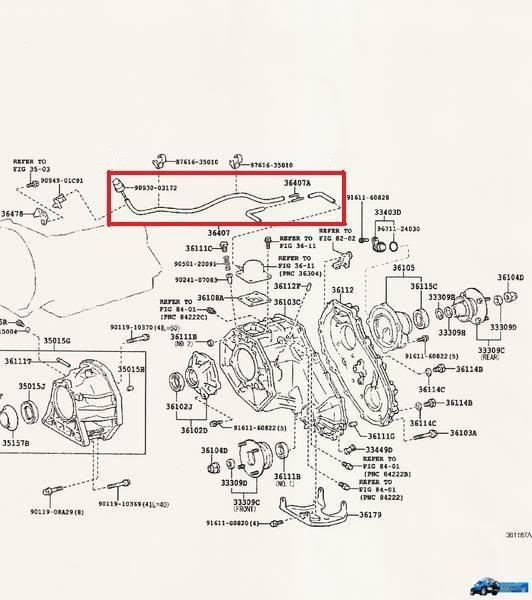
These will need to be relocated up high also either in the engine bay, rear jack storage area or somewhere up high out of the way of any water getting to them.
Transmission & Transfer Case Breathers:
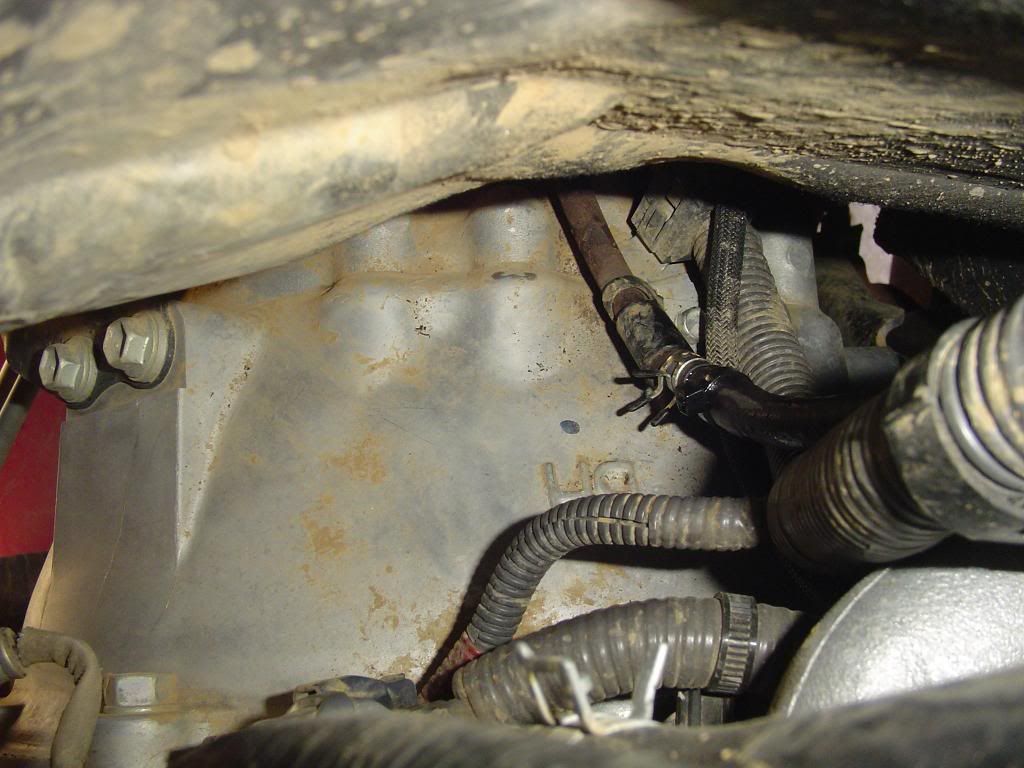
If you open the hood and along the passenger side towards the rear of the the top of the engine, you need to reach down inside and feel. You will find (2) breathers right on top, a plastic one (this is the Automatic Transmission Breather) and a small silver cap one like the E-Locker breather. Both of these need to be removed and placed higher inside the engine bay.
I reached down between the firewall and the rear of the engine and squeezed the hose clamp holding the Plastic AT breather on, I slid it downwards out of the way. I then twisted and pulled on the plastic breather, it pulled off pretty easily.
The AT Transmission Breather after removal
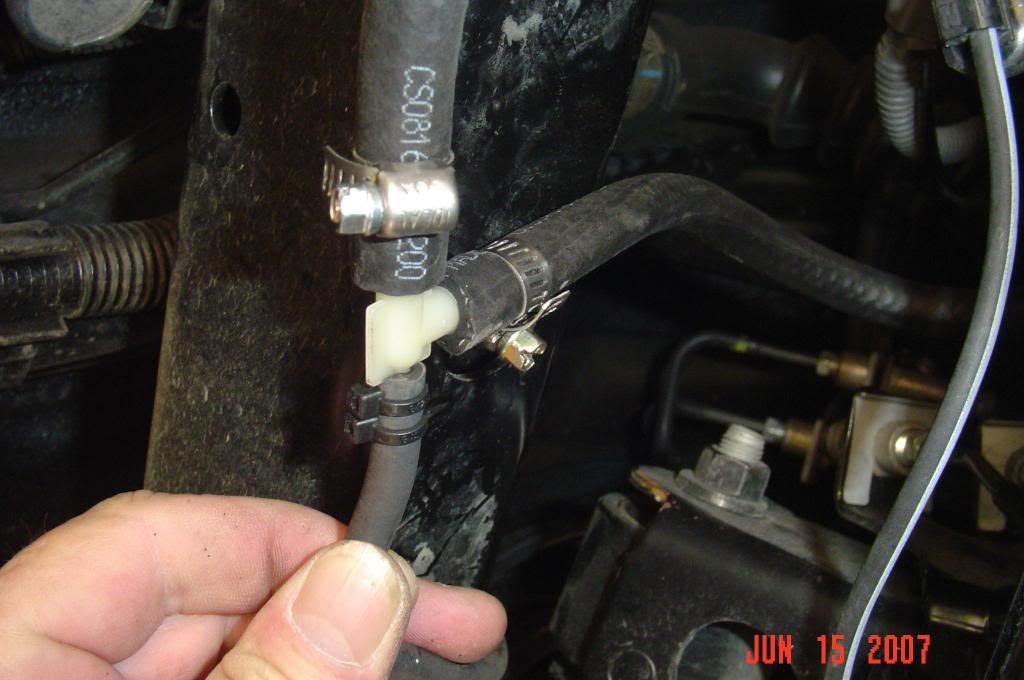
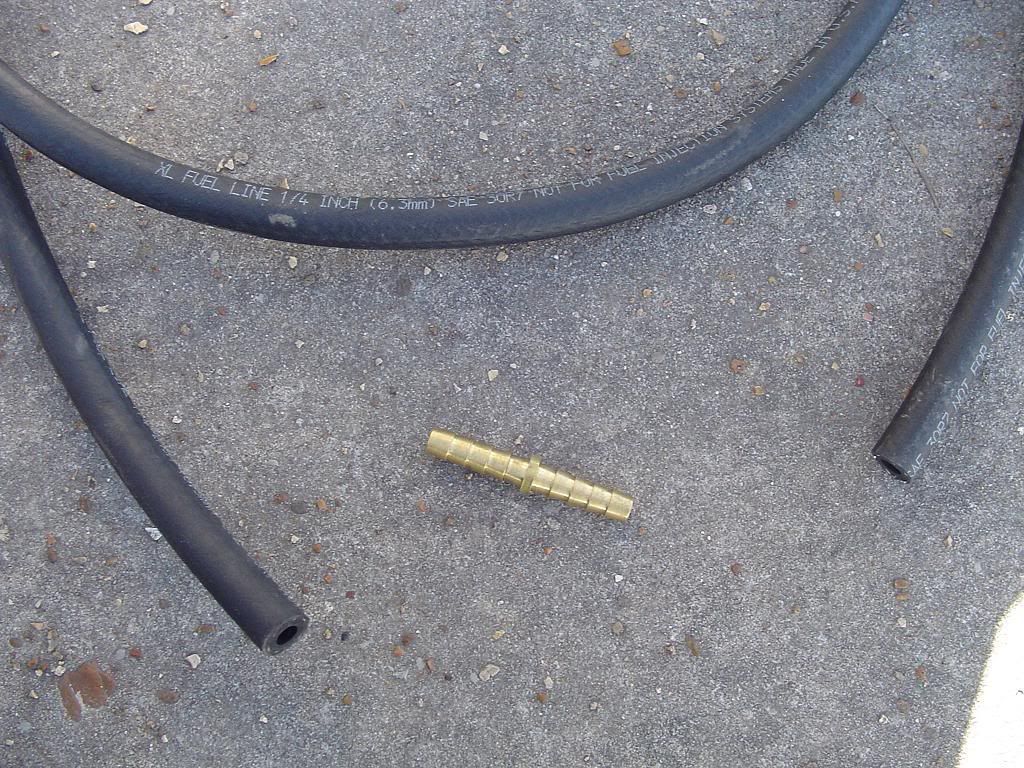
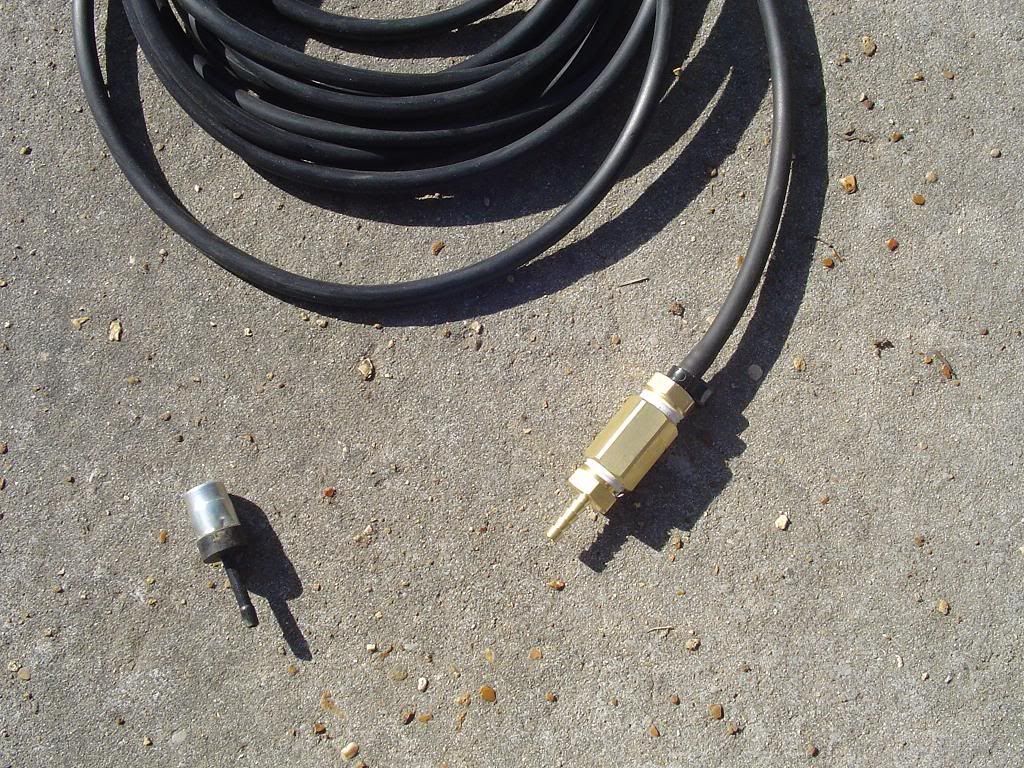
I then took some �� hose with a �� brass coupling and attached it to one end of the hose, securing with a tie wrap. I then sprayed WD 40 on the other exposed end of the brass fitting to allow an easy transition on to the hose. It slid on nicely, I then used another tie wrap to secure that end on to the hose.
New Hose & Coupling to run the breather up into the engine bay higher.
Newly installed Coupling coming from the the Transmission.
I then reached down between the firewall and the rear of the engine and grasped hold of the Transfer Case Breather, it is the metal one like the locker. This one is very easy to remove, just pull firmly and it will slide right off. I then put together another brass 1/8� coupling and installed it on one end of the 1/8� hose. I secured it with another tie wrap. I reached down and slid this one on to the remaining hose. I again secured it with another tie wrap to keep it from coming off.
New 1/8" Hose and Coupling to run the breather up into the engine bay higher.
I then reached down between the firewall and the rear of the engine and grasped hold of the Transfer Case Breather, it is the metal one like the locker. This one is very easy to remove, just pull firmly and it will slide right off. I then put together another brass 1/8� coupling and installed it on one end of the 1/8� hose. I secured it with another tie wrap.
Newly Installed Coupling coming from the Transfer Case.

I reached down and slid this one on to the remaining hose. I again secured it with another tie wrap to keep it from coming off.

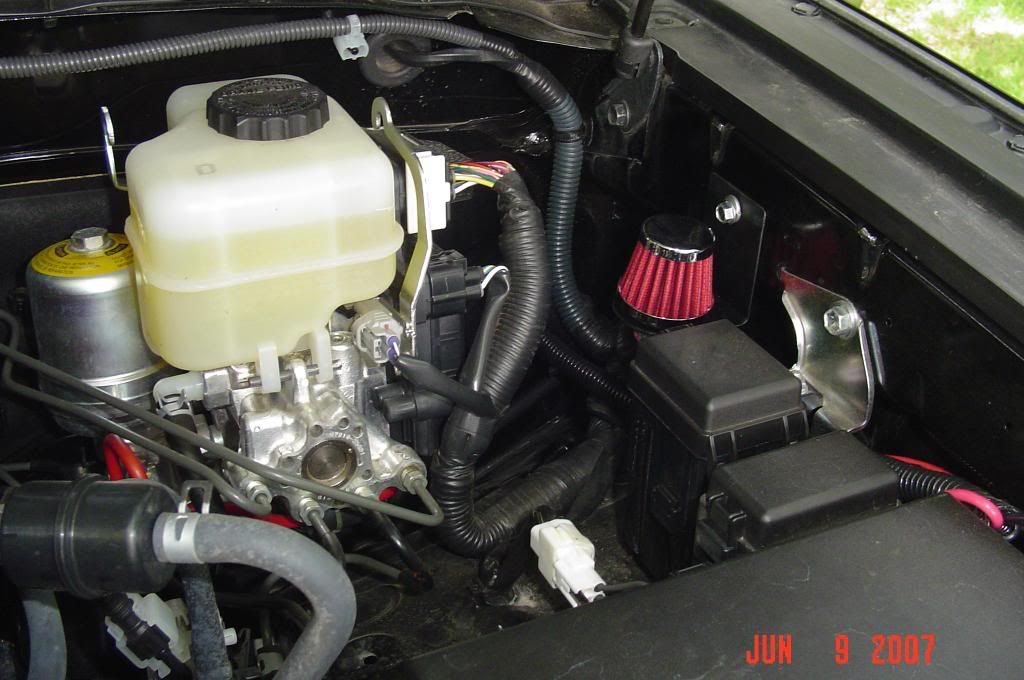
The finshed run of both hoses located higher in the engine bay. I will at a latter date replace the stock valves with a Filter like the Rear Differential and E-Locker.
The new relocated Rear Differential, E-locker, Transmission, Transfer Case breathers completely installed and ready for some SCUBA Driving . I hope this will help others that do any kind of water crossings.
Breather Cost $9.95
Fuel Line Cost $15.00
Hardware Cost $ 1.50
�T� Cost $.50
Leftover Metal $ Free
Union Cost $3.75
Knowing that water can�t get in and damage your rear differential; Priceless
So, for under $30.00 I have the piece of mind of no contamination to the Rear Differential & E-Locker and it looks good too
Good luck to all you SCUBA Drivers out there
The following are some other locations that it can be run to. Thanks for everybody�s support and input on this project
__________________________________________________ _______________________________
Blackcherry�s Location MOD
New location for the breather is in Fuel Door Opening.
_______________________________
Dukeofjuke�s Location MOD
[img] [/IMG]
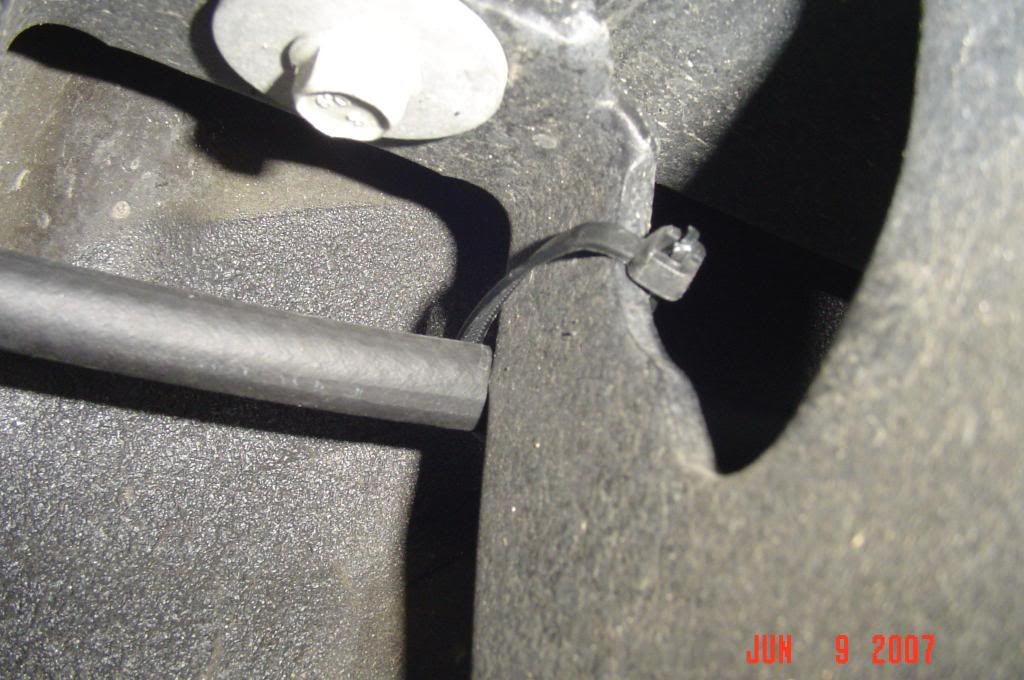
I took a different approach to relocating my rear differential breather. I popped out the rubber seal/plug just behind the driver's side mud flap and ran the rubber hose into the access panel where the jack is stored. I cut a small circular hole in the rubber seal/plug and then applied some silicon.
If you complete the mod Shadow Warrior will send you one of these stickers.....
 "Don't worry about the world coming to an end today. It's already tomorrow in Australia" (Charles Schultz)
I have a 2007 FJ Cruiser (An American knock-off 120) Considerably built up.
I am also a Founding Father of the FJ Bruisers, FJ Cruiser club, in Washington D.C.
Check us out....
[url]http://www.fjbruisers.com[/url]
Our discussion forum....
[url]http://www.fjbruisers.org/forum/[/url]
[img]http://i78.photobucket.com/albums/j115/hayesy72/logo-1.jpg[/img]Comment
-
Mates,
I need to let you know that the transmission breather is a MUST. We have another FJ that had water contamination ruin his AT transmission. $6,000 (US) for a new one, not covered under warranty.
Please remember to add the transmission.
-Ben"Don't worry about the world coming to an end today. It's already tomorrow in Australia" (Charles Schultz)
I have a 2007 FJ Cruiser (An American knock-off 120) Considerably built up.
I am also a Founding Father of the FJ Bruisers, FJ Cruiser club, in Washington D.C.
Check us out....
[url]http://www.fjbruisers.com[/url]
Our discussion forum....
[url]http://www.fjbruisers.org/forum/[/url]
[img]http://i78.photobucket.com/albums/j115/hayesy72/logo-1.jpg[/img]Comment
-
Can't you just run breather tubes into the snorkel?
zjed2006 D4D VX - lots of bits
Trak Shak camperComment
-
Diff breathers
Has anyone done this with a D4D auto with dual air? I can see the gearbox breather, I can touch it with fingertips but there is no way I can join another hose to it! I will try going back to the pipe connection on top of the gearbox and replace the last piece of rubber pipe. Same with the transfer case. Does anyone know if there are any other hoses of the same size up there?
By the way I am using air filters from model aircraft engines, silicon plastic body with dense foam inner with an oiled foam outer and fit nicely onto 1/4" rubber fuel line. Cost $7 ea. Will post a photo once it is all done.My 150 build - http://www.pradopoint.com/showthread.php?27423-A-Random-approach-to-a-Bluestorm-150-GXL-D4D-automaticComment
-
I extended my rear breather roughly as per the following link.
http://www.toyota120.com/html/rear_diff_breather.html
Picked up some perforated plastic filters from ARB (they sell them in their breather extension kits - everything you need jobbies) and just routed it up to the same destination as per the link. Bloody beauty. I used a hose clamp to secure fuel line to the breather on top of the diff which may be my achilles heel.
SeamusComment
-
I'm glad you found 120. It's a good forum for technical stuff.Originally posted by Seamus
Just as a note the 4-Runner has the same running gear as the 120.
-Ben"Don't worry about the world coming to an end today. It's already tomorrow in Australia" (Charles Schultz)
I have a 2007 FJ Cruiser (An American knock-off 120) Considerably built up.
I am also a Founding Father of the FJ Bruisers, FJ Cruiser club, in Washington D.C.
Check us out....
[url]http://www.fjbruisers.com[/url]
Our discussion forum....
[url]http://www.fjbruisers.org/forum/[/url]
[img]http://i78.photobucket.com/albums/j115/hayesy72/logo-1.jpg[/img]Comment
-
G'day Ben
Can't take the credit for finding 120 - I saw it in another thread on this forum (replacing cabin filters I think)
Regards
SeamusComment
-
Has anyone extended the breather on the manual gearbox. The drawing above shows a fitting on the gearbox but no hose. Is this the case and its just a fitting sticking out of the top of the box. If anyone has extended this could you please post a description of haw you did it.
ThanksComment
-
Manual transnission breather found
For all those who have wondered where the manual transmission breather is I found it.
If you remove the center console around the gear sticks, then the rubber boost you will find the gearbox breather just behind the gearstick. It has one of those hopeless little poppet type valves on it.
Hope this is of some help to others who need to extend their breathers.Comment
-
Plastic 1/4" x 1/4" x 1/8� �T� Piece
I'm preparing to do the diff breather mod discussed in this thread and have got all the bit's and pieces togehter except for the Plastic 1/4" x 1/4" x 1/8� �T� Piece used for the rear diff and centre-diff juntion.
Any other suggestions? (I want to avoind building it up from fittings with multiple joins (eg: Enzed brass fittings). Too many points of failure.
Anyone had any luck sourcing one of these Plastic T-Pieces? (The one pictured below)? Where can you get these things? Repco and the Auto places I've asked can't find them in their catalouges.
Cheers
ChrisVX -D4D30 - SilverAsh, Update (Sept 2007), Toyota Towbar, Reverse Sensors, BFG AT's 265/70R17, GMETX3440, ARB Compressor onboard.Comment
-
The only place you need to join the hose is when doing the transfer case. On mine (petrol, Auto) I removed the small hose on the transmission bell housing and replaced with a longer hose and ran into the engine bay.
I am having trouble sourcing the 1/8th joiner (barb), worse case I will insert a copper tube and clamp it at both ends (ref. FlyNDrive picture showing the coupling).Cheers,
Dustie
Self confessed PP addict!! hmm.. now thats not a bad habit is it......
Comment
-
Thanks for the input Dustie.
The transfer case breather comes up past the bell housing and I've got that one sorted. It's how to combine the Center diff lock (FlyNdrive
calls it the eLocker) and the rear diff into one that I'm trying to sort out. A single T joiner would be ideal - but I can't find them anywhere.
Enzed have brass 1/8 barb fittings just like the ones FlyNdrive has used.
Aprox $2.20 each for the 3 parts to make the joiner - so approx $7
Cheers
ChrisVX -D4D30 - SilverAsh, Update (Sept 2007), Toyota Towbar, Reverse Sensors, BFG AT's 265/70R17, GMETX3440, ARB Compressor onboard.Comment
-
Ok, I went to Super Cheap Auto, they have similar looking "T" pieces. You can also try Repco or AutoOne.Originally posted by D4D30
I did the rear diff seperate, ran the hose along the inside of the chassis rail into the engine bay (bit of overkill). At the end I'll have 4 extended breathers.
Thanks, I'll try a different Enzed store. The Enzed store I bought the hose from didn't have the 1/8th barb.Cheers,
Dustie
Self confessed PP addict!! hmm.. now thats not a bad habit is it......Comment
-
Another option suggested to me by a repco 4x4 enthusiast was to run the rear diff breather up the rear column, by the tail-lights. I followed his advice and it was a relatively short piece of hose and easy to thread. I did remove the tail-lights so I could follow my threading, but that wasn't really needed. It's now the highest breather of the 4 8).Originally posted by dustie
LFaR.[size=1][color=#770000]29Feb12:[/color][color=#777700]12GXLTD Auto, ARB Deluxe Winch bar, WARN 9.5xp Winch, IPF 900XS, Tow, Safari snorkel, Front + Rear Recovery points, ARB OME NC Sports, ATZ-4Rib[/color][color=grey], Silver[/color]. [color=orange][b]MaxTrax[/b][/color], [color=maroon]ScanGuage II[/color], [color=blue]ARB CKMA12[/color], [color=deeppink]UHF: GME TX3440 AE4018K1 UNH047SX[/color], [color=darkgreen]Bushranger Air Jack[/color], [color=green]Staun + ARB Deflators[/color], [color=brown]WindCheetah Roof Rack[/color], [color=green]Foxwing[/color], [color=red]Super Charge MRV70, Redarc BCDC1220[/color], [color=darkblue]ARB 60L fridge[/color], [color=blue]MSA Fridge Dropdown slide[/color], [color=darkyellow]DRIFTA Drawers[/color], [color=gold]TJM Bash Plates[/color], [color=brown]TG150[/color].[/size]Comment
Comment